May 23, 2012

Yennegaayi / Stuffed Brinjal (Eggplant) Curry

Been a while since I jotted down my recipes. I am now gulped into a routine life, but that also means I cook almost everyday. Dear Indians, don't laugh at my comment. It is infact a big deal here to cook! and cooking everyday?? Wooof! If I say that out loud, people around me will give me that "OMG" expression. Hehe! So today you are getting one of my best recipes. Yennegaayi!! I remember when I was 8ish, my cousins and I would go to our village with families for summer holidays. Kids would get dinner served in a very different fashion. One of the mommies would mix food in a huge bowl and we would all have our tiny little hands cupped to receive what I can remember, a dozen servings of yummy food. Typically there would be a nice breeze and someone telling us a story and not to forget a big bright moon or dazzling stars.

Anyway, I have verbally given this recipe to so many people that I was sure it deserves a spot on my blog. Badnekaayi, Brinjal, Baingan, Eggplant whatever you call it, is not the most favorite veggie of many people. Mainly because of its inherent flavor. But you gotto trust me on this recipe that no matter how much you like or dislike brinjal, you will love Yennegaayi!! Hmmm yummmm...

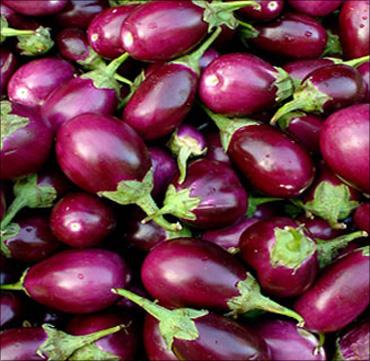
When you look for brinjal/eggplant in store, make sure you find blemish-free tiny round ones as shown below irrespective of the color. You can count 2 for each person or if you are really hungry you could say 3. I would classify making of this dish as "relatively simple" just because of the steps involved in cooking and the actual cooking time would be lesser than making, let's say, bhindi fry(okra fry).
The other ingredients (considering you'll use 10 brinjals) are listed below.

For the masala paste
  • 1 onion cut into chunks
  • 1 tomato cut into chunks
  • 3 tbsp of groundnuts/peanuts
  • 10 twigs of coriander leaves
  • 1 tbsp coriander seeds
  • 1 tbsp sesame seeds (white or black)
  • 1 tsp poppy seeds
  • 1 tbsp red chilli powder
  • 5 pieces of cashews
  • 5 tbsp of shredded dry coconut (in case you don't have shredded, you could use fresh or frozen grated coconut)
  • 1 twig curry leaves
  • 1 inch of ginger coarsely chopped
  • 1 tbsp jeera/cumin seeds
  • 1 tbsp mustard seeds
  • 1 piece of cinnamon
  • 1 small cube jaggery
  • 1 tbsp tamarind paste
  • Salt to taste
Now don't freak out with the number of ingredients. They'll all go into the blender soon! ;-)


Heat 2 tbsp of oil in a pan and add mustard seeds, jeera/cumin seeds, cinnamon, groundnuts/peanuts, coriander seeds, sesame seeds, poppy seeds, ginger, curry leaves, shredded coconut in the same order preferably. If you are using grated coconut, do not bother adding it to the pan. Roast it all by mixing nicely till groundnuts/peanuts turn slightly golden brown. Let the mixture cool and add it in a blender along with coriander leaves, cashews, onion, tomato and grated coconut if applicable. Grind the mixture into a fine thick paste by adding adequate amount of water. Pour this paste back to the pan and add salt, jaggery, tamarind and red chilli powder and let it cook till the blended paste turns slightly darker.

It is a good idea to pre-cook the brinjals halfway beforehand while preparing the masala paste since it saves a lot of cooking time. I'd say microwave it fully immersed in water for 3 mins or you could do the same on stove top. However, pay attention to the way brinjals are cut. You gotto retain the green stem without chopping it off and cut the brinjal from the bottom in quarters, not going all the way to the stem.
Now there are two methods of cooking, one in a pressure cooker and another in a sauce pan with lid. If you prefer to cook in a pressure cooker, one whistle would suffice, but keep the lid closed for 20 mins after you turn off the heat. 

The next stage is to get the masala paste and brinjals together. Here is what you do.
  • Finely chop one onion and fry it in 6 tbsp oil. To this add turmeric, asafoetida and let it fry till onions turn golden brown. 
  • In parallel, carefully stuff the brinjals/eggplants with masala paste without breaking it apart.
  • Add these stuffed brinjals to the saucepan when the onions are ready. 
  • Pour the remaining masala paste on top of these brinjals. 
  • Close the lid and let it cook for 20 mins, during which occasionally turn the brinjals around to ensure it cooks well all around. Do not let the brinjal shrink a lot. That would mean overcooking!
  • When done, you could garnish it with a bit of chopped coriander leaves.
Or when done, I wouldn't wait to serve it on a plate with chapathis or rotis or bread or even with rice and start relishing it.

September 16, 2011

ALOO GOBI - SPICY SAVOR!

When I was wondering what should be the next recipe, my friend Shashi, who is a "food swain", suggested Aloo Gobi! Sure it is a very popular North Indian curry, which you will find in almost all the Indian restaurants' menu. I like to experiment with my dishes to make it quick yet delicious. And here, I am going to tell you just how to make the restaurant style Aloo Gobi in the shortest amount of time.

Aloo is a Hindi word for Potato and Gobi is for Cauliflower. Together they serve as a great combination to eat with bread, roti etc. Well again like my friend says, anything with aloo tastes good. Lol! Do not take it literally though, cos some vegetables are too awkward to be cooked with aloo, for instance Radish, Beetroot. Nope, not at all! 

So for Aloo Gobi, you will have to keep ready
  • 1 large bowl of Cauliflower, cut into bite size florets
  • 1 large bowl of peeled Potatoes, cut into bite size cubes
  • 1 Onion finely chopped
  • 1 cup frozen or fresh Peas
  • 3 cloves of Garlic and 1 inch of Ginger (2 tbsp of ginger garlic paste serves just fine)
  • 2 Tomatoes and 1/2 Onion chopped into big pieces
  • 1 tbsp Cumin/Jeera seeds
  • 1 tsp Coriander powder
  • 1 tsp Jeera/Cumin powder
  • 1 tsp Dry Mango/Amchoor powder
  • 1/2 tsp Garam Masala
  • Red Chilli powder 1/2 tsp (Add more if you like it more spicy hot)
  • Pinch of Asafoetida
  • 8 sprigs of chopped Cilantro/Coriander
  • 5 tbsp Oil (More if you like it crispy, less if you are calorie conscious)
  • Salt
I promised you earlier that I shall give you tips on making this a quicker process. So start with salting the potatoes slightly and popping it in the microwave for 4 mins approx. Cook the cauliflower for 4 mins as well, separately in the microwave. If you do not use microwave, keep the potatoes and cauliflower to boil in a lot of water with salt. Simultaneously, heat oil in a large non-stick Saute` pan, add cumin seeds and asafoetida and let it sizzle. Then toss onions into the pan and saute` till it is half cooked. While onions are getting done, you can go ahead and blend ginger, garlic, onion, tomato and red chilli powder into coarse paste. Try using as little water as you can to get this blended mixture. When onions turn nicely golden brown on the pan, add this paste and give it a good stir. Close the lid and let it cook for 3 mins with regular stirring. During this time, drain the potatoes and cauliflower.

Take some water in a small bowl and add coriander powder, cumin powder, dry mango powder and garam masala and mix it well. Check the color of the paste in the pan, if it is dark and if oil starts separating, it is time to add this masala mix. Add salt and stir it well. Now goes potatoes and peas in the pan. Remember no more water! Cook it in masala for about 4 mins and add cauliflower, toss it well so the spices are evenly distributed and let this cook with lid closed for another 4 mins. Add a bit of salt and give a quick stir. Once the heat is shut, sprinkle it with coriander/cilantro.

Well some people do not believe in multi-tasking. Share this recipe and ask them to follow the same procedure. You will make a believer in them! 

Points to remember:
  • While using a non-stick pan, use only and only wooden spatula. You do not want to scrape the teflon coating by using a metallic spatula and the coating does not even add flavor to your dish. Huh!?!
  • Relax you starch freaks. You are not eating a whole bucket of fries here. Potatoes are not all that bad. But if you strictly think otherwise, sorry for this recipe and sorry that you would not hog such a delicious dish.
  • If the cauliflower is fresh and not frozen, then I would suggest you keep it in hot salt water for at least 10 mins to avoid any biological actions. This mainly applies to folks using cauliflower in India.
  • Save the peeled and cut potato cubes in water to avoid its darkening.
  • Be creative and try substituting cauliflower with capsicum/green pepper or just peas to make aloo capsicum and aloo mutter respectively. But remember every vegetable has its own sweetness, in case of aloo capsicum you have to add less chilli powder and in case of aloo mutter you have to add a little more chilli powder to compliment the sweetness of peas. 
Practice makes anyone perfect. So try this recipe, once and many more times if you like it! Do not forget to drop me a message in the comments section. If you have any particular dish in mind, write to me and I shall try to post those recipes as soon as I can.

Note: 
tbsp = Tablespoon (larger spoon)
tsp = Teaspoon (smaller spoon)
1 tbsp = 3 tsp approx.

September 10, 2011

EXPRESS PANEER PULAV

Sounds like a fast food menu, doesn't it? Ha Ha
As the name suggests, you can prepare this Pulav sooper quick compared to the conventional fry and grind method and today's lead role is played by Paneer.
Pulav is a nice heavy rice-based meal, generally eaten with Raita (Spicy yogurt mix) or with Plain curry or just as is, like I do when I am hungry. I ll post the recipes for these side dishes someday. Pulav can be as hot and spicy as you want or as mild as you wish. The one you are seeing in the attached pictures, was made when I was invited to Thanksgiving dinner at my friend, Trella's place. I made it very mild so they could all taste and sure they did like it. It is always fun to introduce Indian food to all my Non-Indian friends around me, and never have I heard anything less than awesome. Well, either they really liked my food or they are just being very sweet to me. The only way I will know the truth is if you try my recipes and post comments. :-)
 
So to make this Pulav you will definitely need
  • 2 cups basmati or long grain white rice
  • 3 tbsp mint chutney
  • 1 big onion chopped lengthwise
  • 1 green pepper (capsicum) chopped into 1 inch thin strips
  • 1/2 cup fresh or frozen sweet peas
  • 1 cup diced Paneer
  • 8 cloves garlic
  • 2 tbsp butter
  • 1/4 cup oil (Olive, Sunflower, Vegetable or Canola)
  • 2 tsp white pepper powder
  • 1 tsp garam masala
  • 1 tsp cumin powder
  • 2 tsp store bought pulav powder
  • Salt to taste
There are certain compromises that can be made here. For instance, you could use black pepper powder instead of white, or garlic paste instead of fresh garlic, or even better use fresh mint and grind it to a paste. One of my major rules to cook is to know when to break the rules. So try this recipe as is first and when you feel comfortable with the method, tweak it as your spatula guides.

To start with, heat butter in a large stir-fry pan. Just when it starts to melt, grate all the garlic cloves right into it. Saute it till it turns brown. Now wash the rice and add this roasted garlic and mint chutney along with 4 cups of water and some salt. Give it a good stir so that the raw rice, butter, garlic and salt all blend nicely when cooked. Cook this rice mixture in your own conventional method, be it in a microwave or a rice cooker or a pressure cooker. 

For the next step, make sure you keep the same stir-fry pan that you roasted garlic in, because the flavors still hanging in the pan will get infused in all the further ingredients. Heat oil and add chunks of Paneer to it. Fry Paneer till it turns golden brown, then take it out on a plate. Save the oil in the pan for onions and green pepper and while frying these, sprinkle white pepper powder, garam masala, jeera masala and pulav powder on the veggies. Once you see oil separating, add sweet peas. Saute it well and add salt when it is almost done. To this go ahead and add the fried Paneer.

On the other end, rice would have cooked with abundance of flavor from mint and garlic. Toss this rice to the stir-fry pan and give it a good mix with the veggies and Paneer. Do not forget to check the salt content. That's it! There you go, a brilliant Paneer Pulav prepared so quick that you could still catch your favorite episode on TV.

Points to note:
  • You could skip the store bought Pulav masala powder and prepare it fresh at home, in which case the recipe would not have the title "Express".
  • When you cook rice for the Pulav, add a little less water than you usually do. Otherwise the grains will break when you mix it with the veggies and masala.
  • You could add a couple of cloves, cumin seeds and bay leaves into the heated oil before adding onions and green peppers. But with so much flavor already present in the masala, this is definitely optional.
  • Do not use curry leaves or cilantro (coriander) to garnish. It totally doesn't go well with this particular version of Pulav.
There are days when I love to take my own sweet time to cook, but some days demand me to wrap it up as quick as possible. For days like that, try out my Express Paneer Pulav and drop in your words of experience.

September 8, 2011

PAYASA- The First Food

In my culture, they say you should begin your meal with a sweet called 'PAYASA'. So let me start, what is hopefully going to be a very long journey through my recipes to fill your appetite and savor your food cravings. I shall try to bring in my innovative ideas along with the traditional exuberance of my mom's and grandmom's cooking. You can also be sure to see some of my travel-food experiences in my posts to follow.

SHAVIGE PAYASA
It is the most commonly made festive sweet, North Indians call it Kheer. It is a quick, easy and delicious sweet for any occasion. The best Shavige Payasa I have had is the one my granny used to make, with Vermicelli bought from a local manufacturer. It is relatively thin and is so tasty every single time she makes it. I however don't mind any store bought brand.

If you are wondering what Vermicelli is, it is a type of noodles thinner than Angel Hair noodles and can be used for both sweet and savory dishes. I shall add some savory Vermicelli dishes later, but now let us see how to prepare the sweet one, my way!

Make sure you have
  • 1 cup Vermicelli
  • 1 1/2 cup sugar
  • 4 cups whole milk
  • 1/2 cup condensed milk
  • 1 tbsp coconut milk
  • 1/4 cup dry fruits (cashews, raisins, almonds)
  • A pinch of saffron
  • 1/4 tbsp of ground cardamom
  • 3 tbsp of ghee 
The simplest version would only require Vermicelli, Sugar, Milk and Ghee. But the rest of the ingredients are the reason for the amazing flavor in Payasa.

Heat 1 tbsp Ghee in a saucepan and add Vermicelli in it. Fry till it is lightly golden brown. Beware that Vermicelli tends to change color pretty quick. So once you see a nice light golden brown add Milk and stir nicely. When the milk starts to boil, add Coconut milk, Condensed milk and a pinch of Saffron and give it a light stir. Keep the flame low and let it cook for 20 mins.

On the other stove, heat 2 tbsp Ghee in a very small frypan and add all the dry fruits. Soon after the dry fruits turn golden brown, turn the flame off. Keep slightly stirring the ingredients in the saucepan till the milk reduces to 1/4th its quantity. Reducing the milk and cooking Vermicelli all the while makes the mixture very rich and it gains a nice thick texture. Now time to add the dangerous ingredient, the Sugar! Mix it well and add the fried dry fruits to this.

Well here it is, your yummy mouth watering Shavige Payasa.
Try it and let me know!

Points to Note:
  • When you boil Vermicelli with milk, milk tends to overflow, in which case you will need to reduce the flame and continuously stir.
  • Sometimes people add any dry fruits available, but make a mental note not to add walnuts. I did this once and it gave a weird flavor to the Payasa. Something you would want to avoid.
  • If you are not aware of Ghee, look for it in the 'Oil' section in any grocery store. Or else, heat butter till it melts completely and changes color. And you can only use unsalted butter.
  • Some people don't bother adding condensed milk and coconut milk. But trust me, it adds such richness to the Payasa, that once you have tried it, you would not want to go back.
Good Luck Folks!